Set Up Your Phone with Mobile-X

Written by Marissa Orsini
Updated at May 8th, 2025
Table of Contents
Scope
Intended Audience: End Users
This article outlines how to configure your unlocked iOS or Android device with Mobile-X.
Requirements
- Mobile-X provisioned SIM or QR Code for eSIM (You should have received this from your provider)
- Unlocked iPhone XR or newer, using iOS 15.4 or higher OR Samsung Galaxy S21
- A paperclip
Quick Links
Physical SIM
- Use a paperclip or thin object to open the SIM tray on your phone
- Insert the SIM into your tray and place the tray back into your phone
- Your device should begin working immediately. Check to make sure you can make & receive calls, send SMS and MMS, and access the internet.
- If your device does not begin working immediately, you must configure the APNS settings in the section below.
- If your provider offers hotspot capabilities, follow these steps to set up your hotspot
eSIM for iOS
- From your iOS device, go to Settings > Cellular Data
- Select Add eSIM

- Select Use QR Code and scan the provided code

- Press Continue
- You will be prompted to enter a name for the SIM, choose a descriptive name or one of the preselected labels
- Choose which SIM to use for mobile data
- If your device does not begin working immediately, you must configure the APNS settings listed below.
- If your provider offers hotspot capabilities, follow these steps to set up your hotspot
eSIM for Android
- From your Android device, go to Settings > Connections

- Select SIM card manager

- Select Add mobile plan

- Select Scan carrier QR code and scan the code provided

- Select Confirm

- Select whether to allow your secondary SIM to use data during phone calls

- Under Preferred SIM Card, choose which SIM to use for data and MMS
NOTE: The Samsung Galaxy S21 has a known issue where only the preferred SIM in a dual SIM setup may be used to send and receive MMS messages.
- If your device does not begin working immediately, you must configure the APNS Settings listed below.
- If your provider offers hotspot capabilities, follow these steps to set up your hotspot
Configure APNS Settings (iOS)
- From your iOS device, go to Settings > Cellular Data
- Navigate to Cellular Data Options and set Data Roaming to Enabled

- Select Voice & Data and confirm 4G or LTE is selected and VoLTE is Enabled

- Navigate to Cellular Data > Network Selection and make sure Automatic is Enabled

- Navigate to Mobile Data Network
- Scroll down to MMS and set the APN to globaldata
NOTE: Make sure not to exit the field
- Scroll back up and set Use Carrier Settings to Enabled

- Reboot your device
Configure APNS Settings (Android)
- From your Android device, go to Settings > Connections
- Select mobile networks

- Select Access Point Names
- Select the APNS settings for the business SIM
- Select Add New
- Enter the fields below
- Name: globaldata
- APN: globaldata
- MMSC: http://mms.mobileuc.global/
- Multimedia message proxy: 37.18.129.90
- Multimedia message port: 8008
- APN Type: default, mms
- APN Protocol: IPv4/IPv6
- APN roaming protocol: IPv4/IPv6
- Click Save
- Ensure the newly created globaldata APNS is selected
- Reboot your device
Apple iPhone - Dual SIM with an eSIM - Switch Designated iMessage / FaceTime Number
-
Note: If you need to switch the mobile number used for iMessage® and FaceTime® on your Dual SIM with an eSIM capable Apple® iPhone®, follow these step-by-step instructions.
Note:The steps below apply to the following Apple iPhone models:- iPhone XS / XS Max and newer models
- iPhone SE (3rd Gen)
-
With Dual SIM setup on your device, you can use iMessage and FaceTime with two mobile numbers. Select the mobile number(s) by doing the following:
Select Number(s) Used for iMessage
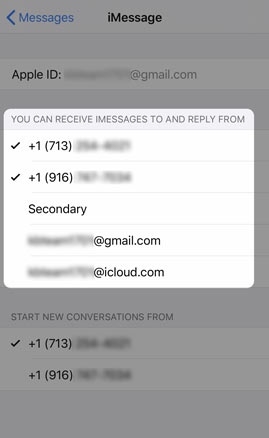
- From a Home screen, navigate: Settings>Messages.
- If an app isn't available on your Home screen, swipe left to access the App Library.
- Tap Send and Receive.
-
Select the mobile number(s) you'd like to use with iMessage.
-
Selected when a checkmark is present.
-
Selected when a checkmark is present.
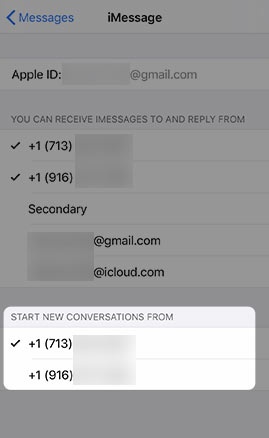
- If 2 mobile numbers are selected, select the desired number used to start new conversations.
- Selected when a checkmark is present.
Note: For additional Dual SIM info, check out this Apple article.
- Selected when a checkmark is present.
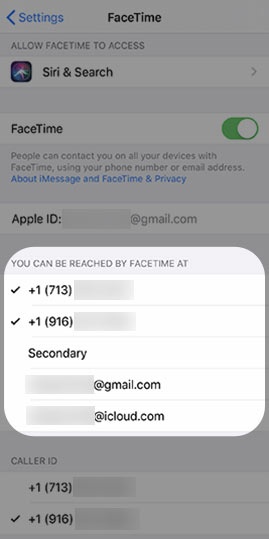
Select Number(s) Used for FaceTime
- From a Home screen, navigate: Settings > FaceTime.
- If an app isn't available on your Home screen, swipe left to access the App Library.
- From the 'YOU CAN BE REACHED BY FACETIME AT' section, select the desired number(s) used for FaceTime
- Selected when a checkmark is present.
Note: For additional Dual SIM info, check out this Apple article.
- Selected when a checkmark is present.